First things first: don't forget to get your free Slurpee today! And don't let them trick you into buying anything else.
Second things second: I have finally used up all of my radioactive yellow fabric. Because of what I'd like to think of as imaginative counting, I ended up with two differently sized squares. Which means that only one of these Pikachus is capable of love.
After staring at hand-stitched Pikachu (which is really a bleak moment in one's wasted life), I decided it wouldn't look right without the stripes. Which are actually brown, but I thought that a limited palette would be more aesthetically pleasing. Because true artists take those things into consideration when stitching Pikachu.
Monday, July 11, 2011
Saturday, July 9, 2011
Balls
So, I saw these beautiful chocolate covered strawberries that are actually cake. And I thought, "I can make these for my dear friend's birthday. And everyone will look at my stupid dessert thing and worship me as a god! A god, I say!"
After I finished laughing maniacally, I hit obstacle #1: no red velvet cake mix at the Kroger. Using my enormous brain, I decided that I could just use strawberry cake and strawberry frosting. I returned home, confident and full of hubris, to bake my cake.
In theory, cake pops are made by crumbling up cake and then mixing it with frosting. It's easiest to mix it by hand, so this stage is wretchedly disgusting.
Instead of rolling my future cake pops into balls, I made strawberry shapes of varying competence before shoving them in the fridge.
My friends, cake pops are a lie. They taunt you with their smooth, candy-coated surfaces and their charming details. But man was not meant to dip wads of cake in candy! I was like Icarus, flying higher and higher until the Sun melted my candy into twisted, deformed shapes.
A lesser person would have given up in despair. She would have gnashed her teeth and torn out her hair. I rebranded.
If I couldn't make beautiful fake strawberries, I'd bring the chum bucket. Which I decided was totally appropriate since it was a beach themed party.
Even my greedy, gluttonous family was not enthusiastic about eating from the chum bucket for some reason.
Yesterday, like Icarus dragging his zombie corpse out of the sea, I decided it was time to try another cake pops related craft. Since this one involved chocolate, I assumed it would be easier to trick people into eating it.
First saw the idea on Bakerella's site, but Google spits out a few other versions.
What you need:
Once the cookies are crushed into a fine powder (or, you know, close enough), add in the Neufchatel/cream cheese. Attempt to stir it with a spoon, then a knife, then just use your hands. Ideally you put wax paper on a flat, movable surface (like a cookie sheet) before you shoved your hands in the mixing bowl. When your heart tells you it's ready, roll the dough into little balls and place them on your flat, movable surface. Put your balls in the fridge and have some wine. Let chill until you're slightly buzzed.
Melt the chocolate--if it's Wilton Candy Melts or the kind they sell at Ben Franklin, 45 seconds for the first time through the microwave, stir, then 30 seconds each time until they're melted.
I found it much easier to take a spoonful of chocolate and drip it/smooth it over my balls. You don't get full coverage, but...well, the chum bucket was the result of dipping.
After coating your balls in chocolate, put them back in the fridge. Have some more wine--you've earned it. After the chocolate hardens, you can move your balls if your flat, movable surface takes up too much space.
After I finished laughing maniacally, I hit obstacle #1: no red velvet cake mix at the Kroger. Using my enormous brain, I decided that I could just use strawberry cake and strawberry frosting. I returned home, confident and full of hubris, to bake my cake.
In theory, cake pops are made by crumbling up cake and then mixing it with frosting. It's easiest to mix it by hand, so this stage is wretchedly disgusting.
Instead of rolling my future cake pops into balls, I made strawberry shapes of varying competence before shoving them in the fridge.
My friends, cake pops are a lie. They taunt you with their smooth, candy-coated surfaces and their charming details. But man was not meant to dip wads of cake in candy! I was like Icarus, flying higher and higher until the Sun melted my candy into twisted, deformed shapes.
A lesser person would have given up in despair. She would have gnashed her teeth and torn out her hair. I rebranded.
If I couldn't make beautiful fake strawberries, I'd bring the chum bucket. Which I decided was totally appropriate since it was a beach themed party.
Even my greedy, gluttonous family was not enthusiastic about eating from the chum bucket for some reason.
Yesterday, like Icarus dragging his zombie corpse out of the sea, I decided it was time to try another cake pops related craft. Since this one involved chocolate, I assumed it would be easier to trick people into eating it.
First saw the idea on Bakerella's site, but Google spits out a few other versions.
What you need:
- Package of Store brand chocolate sandwich cookies (unless you've got Oreos money)
- 8 oz of Neufchatel cheese (I figured it'd be okay to use instead of cream cheese since there was a picture of cheesecake on the box), softened
- Chocolate candy melts
- Wax paper
- Mixing bowl
- Large ziploc bag and rolling pin
Once the cookies are crushed into a fine powder (or, you know, close enough), add in the Neufchatel/cream cheese. Attempt to stir it with a spoon, then a knife, then just use your hands. Ideally you put wax paper on a flat, movable surface (like a cookie sheet) before you shoved your hands in the mixing bowl. When your heart tells you it's ready, roll the dough into little balls and place them on your flat, movable surface. Put your balls in the fridge and have some wine. Let chill until you're slightly buzzed.
Melt the chocolate--if it's Wilton Candy Melts or the kind they sell at Ben Franklin, 45 seconds for the first time through the microwave, stir, then 30 seconds each time until they're melted.
I found it much easier to take a spoonful of chocolate and drip it/smooth it over my balls. You don't get full coverage, but...well, the chum bucket was the result of dipping.
After coating your balls in chocolate, put them back in the fridge. Have some more wine--you've earned it. After the chocolate hardens, you can move your balls if your flat, movable surface takes up too much space.
Thursday, June 30, 2011
American Girl
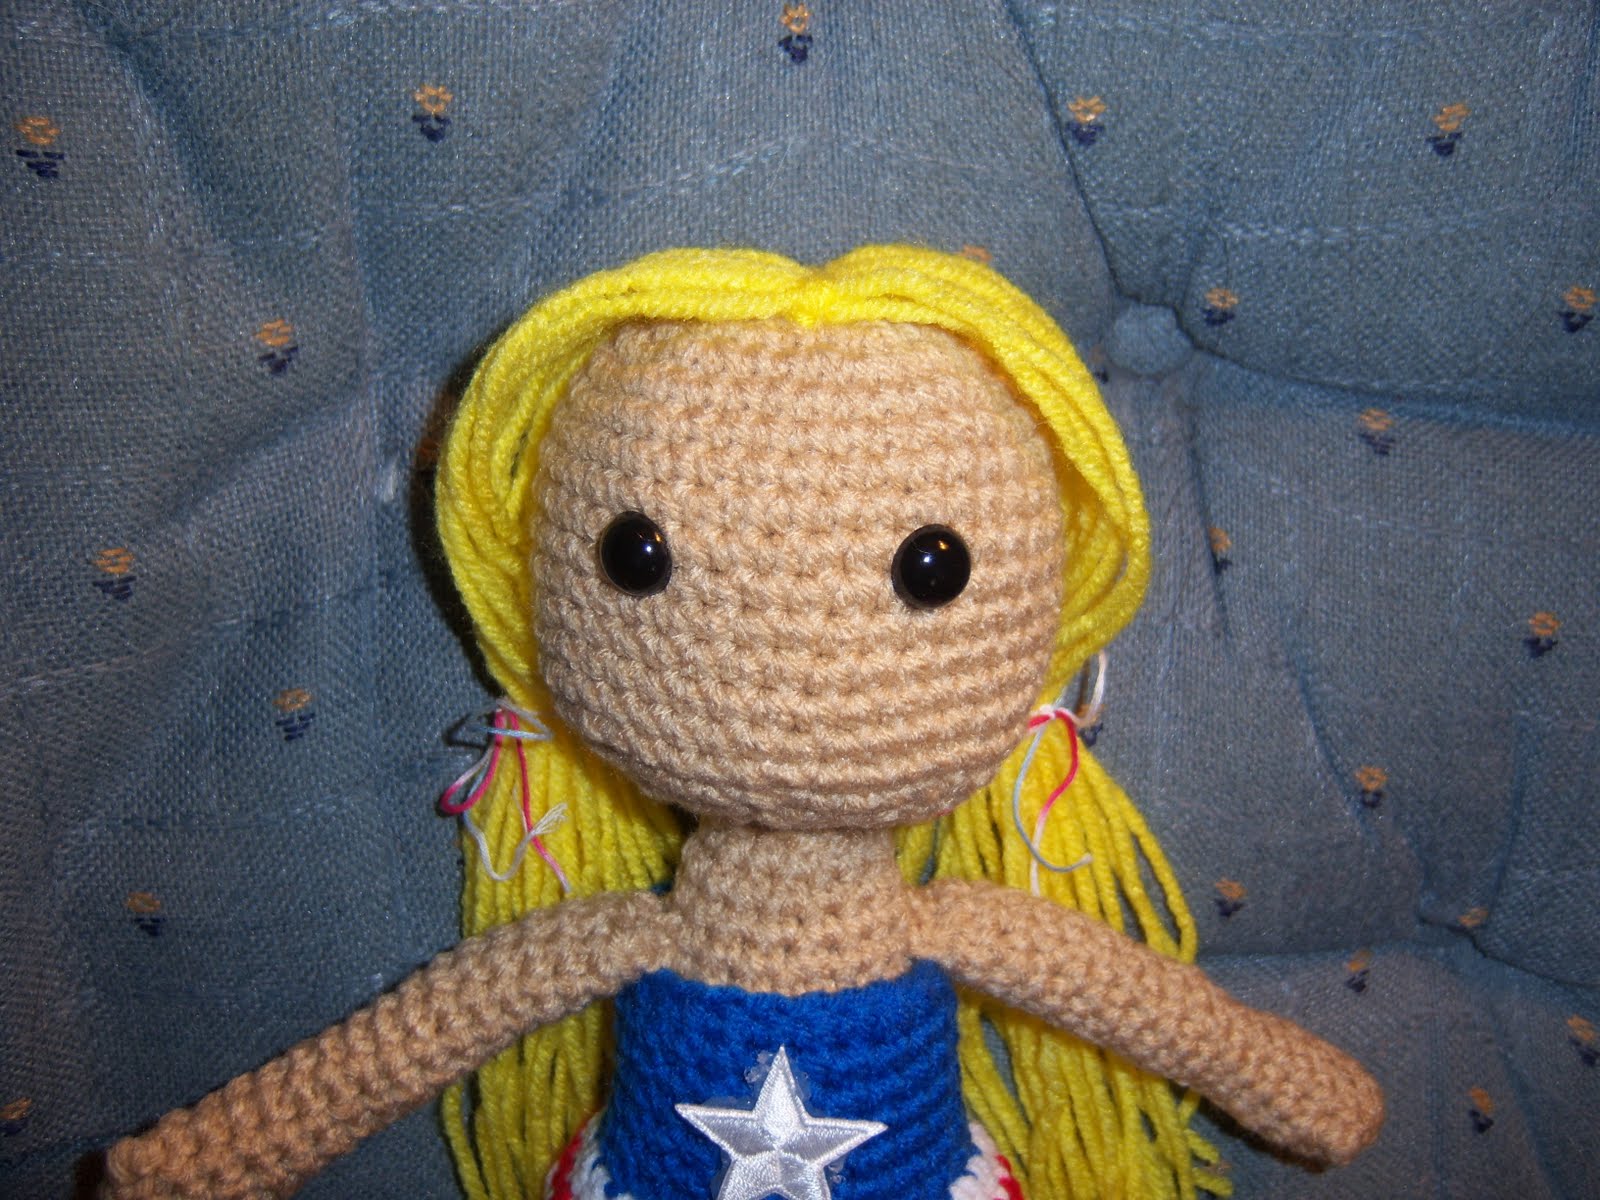
So, originally I thought that I'd weasel out of spending 4th of July weekend with my family, but send some festive token of my esteem. And then the rest of my family weaseled out of spending 4th of July weekend with the family. Which meant that I needed to get this damn thing done in time for mailing.
There are two ways to crochet in the round: the super cool awesome people's way, and joined rounds. The joined round technique was invented by Satan at the request of Adolph Hitler [citation needed]. The Lily doll's 4th of July dress involves joined rounds. And some other shennanigans, but I just did what I always do when I don't understand a pattern: steal the closest thing out of Amigurumi World/Amigurumi Two/Amigurumi Toy Box. My doll's body is actually the Toys in Pajamas body from Amigurumi Two! (with some adjustments and changes to get it to match up with what I assume the Lily pattern was trying to do).
This is my first project with hair. What with the deadline I didn't have time for some yarn company's jibber jabber about tape and tissue paper and sewing machines. I would invite you to imagine an idiot, screaming in stupid agony as she sews her own hand to a tangled mass of yarn and tissue paper, but I don't want to give you the impression that I actually know how to thread a sewing machine. So instead imagine an idiot using a two sentence online tutorial and a yarn needle.
I think this picture--which makes you all sex offenders, btw--is before I cut the doll's hair.
The secret to joined rounds is apparently a tight deadline and hoping nobody looks at the back of this thing.
Apparently I don't work well under pressure because the first star got hot glued on with the wrong side up.
I like that these dolls have different outfits (even if I'm too stupid to really understand how to make them), but they're written so that the doll's shoes are sewn to her feet or actually are her feet. I knew I wouldn't have time to make the nice sandals anyway, so these are the beginning of the nice sandals with a tail of yarn sewn to both sides. If you look closely you can see that there are technically two "straps" on each shoe, but I think it's pretty well hidden. And if staring at the shoes keeps anyone from looking at the back...
I was going to leave the doll's hair loose so I wouldn't have to worry about coverage on the back of the head, but then I decided I didn't want to have to put on the note, "Happy 4th of July, Grandma! Please neatly rearrange your present's hair with your arthritic fingers!"
For the hair ties I used two pieces of variegated embroidery floss. I tied it in the back in the hopes of avoiding some hideous, bizarre bald spot, then turned the bows towards the front. Man oh man, I hope nobody looks at the back of this thing.
Did Lily get a mouth before her maker rushed to the post office? No, no she did not, but she did get to the post office before 5, and Kate got a raging case of Nintendo thumb.
There are two ways to crochet in the round: the super cool awesome people's way, and joined rounds. The joined round technique was invented by Satan at the request of Adolph Hitler [citation needed]. The Lily doll's 4th of July dress involves joined rounds. And some other shennanigans, but I just did what I always do when I don't understand a pattern: steal the closest thing out of Amigurumi World/Amigurumi Two/Amigurumi Toy Box. My doll's body is actually the Toys in Pajamas body from Amigurumi Two! (with some adjustments and changes to get it to match up with what I assume the Lily pattern was trying to do).
This is my first project with hair. What with the deadline I didn't have time for some yarn company's jibber jabber about tape and tissue paper and sewing machines. I would invite you to imagine an idiot, screaming in stupid agony as she sews her own hand to a tangled mass of yarn and tissue paper, but I don't want to give you the impression that I actually know how to thread a sewing machine. So instead imagine an idiot using a two sentence online tutorial and a yarn needle.
I think this picture--which makes you all sex offenders, btw--is before I cut the doll's hair.
The secret to joined rounds is apparently a tight deadline and hoping nobody looks at the back of this thing.
Apparently I don't work well under pressure because the first star got hot glued on with the wrong side up.
I like that these dolls have different outfits (even if I'm too stupid to really understand how to make them), but they're written so that the doll's shoes are sewn to her feet or actually are her feet. I knew I wouldn't have time to make the nice sandals anyway, so these are the beginning of the nice sandals with a tail of yarn sewn to both sides. If you look closely you can see that there are technically two "straps" on each shoe, but I think it's pretty well hidden. And if staring at the shoes keeps anyone from looking at the back...
I was going to leave the doll's hair loose so I wouldn't have to worry about coverage on the back of the head, but then I decided I didn't want to have to put on the note, "Happy 4th of July, Grandma! Please neatly rearrange your present's hair with your arthritic fingers!"
For the hair ties I used two pieces of variegated embroidery floss. I tied it in the back in the hopes of avoiding some hideous, bizarre bald spot, then turned the bows towards the front. Man oh man, I hope nobody looks at the back of this thing.
Did Lily get a mouth before her maker rushed to the post office? No, no she did not, but she did get to the post office before 5, and Kate got a raging case of Nintendo thumb.
Monday, June 20, 2011
Vaporeon, I choose you!
Since I'm at the beach, you can revel in the majestic awesomeness of Vaporeon, the bubble jet Pokemon!
I've already got a standard Vaporeon sprite stitched up and (badly) framed in a plastic hoop. Now I just need to figure out what to do with the shiny Vaporeon and if I should add any bubbles. Or sparkles.
This is how the magic happens. And by "magic", I mean "I stare at a computer screen, trying not to go blind. Or poison myself from putting cheap colored pencils in my mouth." It's almost as glamorous as training Pokemon.
Even though it's a different color palette (and difficult to find official drawings of to check the colors), this was the sort of sprite where certain colors just seemed obvious. I could probably have dithered over the purples for the rest of my pathetic life, but the spine and fins? Obviously could not be anything other than 814.
The blue Vaporeon is the second frame from Diamond/Pearl. This one's based on the Black/White sprite. Apparently they don't do the crappy little animations anymore?
I'm thinking of doing another hoop (but not being a complete failure monkey at finishing the back of the hoop). I know I can get a hoop of the right size in purple, but I know it's not lavender. Internet, is a dark purple hoop going to look awful? Remind me how fabulously inspired my first hoop choice was?
On the way to the beach I started working on the Gold sprite. Which is how I discovered that Gold and Silver had different sprites. Ahh, for those bygone days when people put an effort into their nearly identical games! Since I'm sure you're super interested, I had Crystal because it let you be a girl.
I've already got a standard Vaporeon sprite stitched up and (badly) framed in a plastic hoop. Now I just need to figure out what to do with the shiny Vaporeon and if I should add any bubbles. Or sparkles.
This is how the magic happens. And by "magic", I mean "I stare at a computer screen, trying not to go blind. Or poison myself from putting cheap colored pencils in my mouth." It's almost as glamorous as training Pokemon.
Even though it's a different color palette (and difficult to find official drawings of to check the colors), this was the sort of sprite where certain colors just seemed obvious. I could probably have dithered over the purples for the rest of my pathetic life, but the spine and fins? Obviously could not be anything other than 814.
The blue Vaporeon is the second frame from Diamond/Pearl. This one's based on the Black/White sprite. Apparently they don't do the crappy little animations anymore?
I'm thinking of doing another hoop (but not being a complete failure monkey at finishing the back of the hoop). I know I can get a hoop of the right size in purple, but I know it's not lavender. Internet, is a dark purple hoop going to look awful? Remind me how fabulously inspired my first hoop choice was?
On the way to the beach I started working on the Gold sprite. Which is how I discovered that Gold and Silver had different sprites. Ahh, for those bygone days when people put an effort into their nearly identical games! Since I'm sure you're super interested, I had Crystal because it let you be a girl.
Just like the shiny sprite, I still need to finish the ruff. Careful spriters may notice that I added a single pixel to the mouth to make a happy Vaporeon (actually, are species names always treated as proper nouns? Isn't it about time we figured out Pokégrammar?). And I screwed up the tip of the ear, but my darling sister pointed out several other horrific flaws (that were actually part of the pattern), so I decided that I'm on vacation. And lazy.
Thursday, June 16, 2011
Working for peanuts
I finally rationalized getting Amigurumi Toy Box. First project: tiny elephant. Possibly a tiny vampire elephant since I used my special sparkle yarn.
This elephant has beautiful, chocolate brown eyes. Its sister would have ugly, muddy brown eyes, but nobody sells those. Because nobody wants to make an amigurumi with gross hazel eyes.
My cat has gotten so fat that even elephants look tiny next to her.
If I'd known when my tutoring program was ending, I might have tried to make up another one and give them to tutoring kids. My third graders and I recently read the chapter in Ramona and Her Mother where Ramona tries to sew pants for her stuffed elephant.
This elephant has beautiful, chocolate brown eyes. Its sister would have ugly, muddy brown eyes, but nobody sells those. Because nobody wants to make an amigurumi with gross hazel eyes.
My cat has gotten so fat that even elephants look tiny next to her.
If I'd known when my tutoring program was ending, I might have tried to make up another one and give them to tutoring kids. My third graders and I recently read the chapter in Ramona and Her Mother where Ramona tries to sew pants for her stuffed elephant.
Monday, June 13, 2011
The upcycling that will change the DCU FOREVER!
Congratulations on surviving the 90's! If you endured the comic books of this surly, sarcastic decade, you may have several boxes of floppies, carefully sealed in mylar bags to make sure your precious investment would be in pristine condition for the eBay of tomorrow! And since every other sad nerd did this, your complete collection of alternate covers for The Death of Superman is worth slightly more than your POGs.
I still haven't figured out what to do with my POGs, but I have found something to do with the comic books that nobody was willing to pay even a penny for! Such as The Titans #3. I don't have the slightest clue why I even own this book since it's not a totally necessary part of a Mega Disaster Bat-Books Crossover, and I can't remember ever giving a shit about the Teen Titans.
Step 1) Find brads. Brads are those crazy little round headed dealies with the parts you fold up that nobody makes anymore. I finally found them on a bottom shelf in Staples. I recommend starting in the thumbtacks/paper clips area. They're the small "1-inch fasteners" box.
Step 2) Craftster tutorial.
One thing it took me a shamefully long time to figure out: wider strips make bigger, but shorter loops. Put those at the beginning.
Also, and I'm not sure how to explain this, the bows won't sit right unless you make them strip ends side up. Smooth side down? If that doesn't make sense, make a bow. If it's ugly, pull out the brad and turn the pieces upside down.
Brads aren't very sharp. I think some people over in the Craftster thread use seam rippers. I've been using that little thing on the nail clippers.
Wednesday, June 8, 2011
Gardening and Punching
My strategy of spending the day crocheting--instead of actually reviewing my purple belt material--paid off.
And now I don't have to worry about testing again in my wretchedly hot gi during the wretchedly hot summer months. I may only be a purple belt in American style karate, but I am a black belt in sweating. And complaining.
Since it's the most wretched part of summer, I'm probably done planting. And possibly going outside to water the plants. Sorry, vegetation; it's too damn hot.

I planted three of these orange lillies last year. They've come back with a vengeance.
And now I don't have to worry about testing again in my wretchedly hot gi during the wretchedly hot summer months. I may only be a purple belt in American style karate, but I am a black belt in sweating. And complaining.
Since it's the most wretched part of summer, I'm probably done planting. And possibly going outside to water the plants. Sorry, vegetation; it's too damn hot.
I planted three of these orange lillies last year. They've come back with a vengeance.
Subscribe to:
Posts (Atom)