Showing posts with label arts and krafts. Show all posts

Monday, June 30, 2014

Rammy

 Apparently I've been so caught up in the fun and excitement of being underemployed that I never posted Rammy.

Rammy was made for Kristen's birthday.  Nothing says "Happy Birthday, UNC Legal Staff" like turning a Kid Robot Mini Raffy into a bootleg UNC toy.

When I first imagined the Raffy to Rammy transition, I considered sculpting beautiful Carolina blue horns.  Fortunately this delirium passed, and I bought a paint pen instead.

After Rammy's face was completed, Rammy was decapitated for fleecing purposes.  This involved gluing pom poms onto a decapitated giraffe body.

The only difference between DIY giraffes and DIY sheep is one's willingness to glue pom poms.  Also, I'd like to thank Munnyworld for not giving this thing the most distinctive feature of a giraffe so that it could easily be turned into a ram.


Rammy now lives happily among the actual licensed rams.


Monday, June 23, 2014

Photo Booth Magnets

Brian and I found a photo booth at the mall on Friday.  Oh, nobody told you?  Going to the mall on a Friday night is totally cool now.

I'm not sure how photo booths still exist now that people's grandmothers have fancier phones than I do, but this one let you choose awesome effects and printed out a big sticker sheet.  Sophisticated trendsetters that we are, we went with 80s.  In the 1980s, everything was neon, and now so are we.

Harnessing the power of technology, I scanned the sticker sheet.  According to the booth, the sheet could be peeled off and folded in half and then torn to pieces or something (I've only made it as far as "peel and stick together").  On the back of each of the four pictures is a collage of all four images.  This probably doesn't make any sense since I've tried and failed to explain it to Brian multiple times, but the collage is in the lower right corner.

Here are the three respectable pictures and the smaller versions to be made into magnets with the necessary materials: business card magnets and scissors that cut well, but that you won't really care if you ruin them with adhesive magnets.

The small pictures and the magnets aren't quite the right shape, but I didn't want to deal with a huge magnet sheet that I wouldn't use all of.  Cutting carefully, it's possible to save a little magnet end.  Peel back the white backing just enough to put the picture down, then use the paper to press the picture to the magnet.  This also prevents fingerprints, so you can also use the magnet backing to hold the picture/magnet while you trim off the extra.

I may try to find a screen protector to put on top of the pictures so that they can be more functional magnets instead of "potentially smeared with everyone's grubby fingers."  I thought I still had some, but apparently I've been lovingly treasuring the package the screen protectors came in.

Monday, December 16, 2013

Last Minute Christmas Decorating (and Drinking)

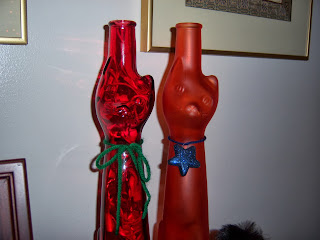
This is a good craft for lazy people who need a last minute Christmas decoration and who would like to drink away their holiday feelings.

Step 1: Get some Cat Wine.  Sometimes cat wine appears at Kroger, and I found the orange cat wine at World Market this year.

Step 2: Drink the wine.  Cat wine is smaller than regular wine, so you can totally knock this out while you watch the greatest Christmas movie ever made: Batman Returns.

Step 3: Rinse out the bottle.  Don't forget to shake it like a Polaroid picture--or like a Snapchat for you damn kids--to get most of the water out.  Lay the cat down on a towel to dry.

Step 4: Embellish.  Give your cat a yarn or ribbon collar.  In honor of Brian's favorite colors, I have used some navy blue yarn to attach an ornament to the orange cat.

For clear glass cats, get some miniature lights.  Rice lights might be too small to fill up the whole cat, and the effect isn't as bright.  I used a string of 20 Christmas lights from A.C. Moore.  Carefully feed them into the wine bottle.  If the lights get stuck, use a pencil to slowly push them further in or pull the bulb back out and try feeding it in again.

Once all the lights are in the cat, the cord may be a bit short.  Be flexible with cat placement or get an extension cord.

Step 5: Set up Decorative Christmas Cat in a place that needs more Christmas cheer and open another bottle of wine to celebrate.
 

Monday, March 18, 2013

Pets leave paw prints everywhere else

I've been eyeing the Pet Announcement kit on the Richmond SPCA's clearance shelf for awhile.  I think announcing a pet or having a puppy/kitten shower is a classic dick move, so my cunning plan was to buy the kit and share it with other pet owners so we could all have cute little things to frame.  Because we are all childless and crazy, but not "send out pet announcements like a fucking weirdo" crazy.

The Pawprints Pet Announcement kit assumes that you have a pet that will remain perfectly still while allowing you to squish its foot on some weird magic ink pad thing.  Unfortunately, all cats hate the following things:

  1. Art projects
  2. Doing what you want them to do
Plan B: set up Pawprints Pet Announcement no-mess ink pad and perforated paw print cards as directed on the floor and wait for the cat to step on it.

Monday, March 4, 2013

I should be so lucky

Having discovered that Sharpies are faster than embroidery, I decided to get a multipack of onesies and decorate them for various babies.  This cunning plan was thwarted by A.C. Moore not selling onesies, so I couldn't use my coupon and teacher discount.

Back up plan: toddler sized T-shirts.

This is a transfer from the Sublime Stitching Craft Pad (It's also included in the Sushi Bar pattern).

Let's just say blue is for good luck in learning.  And because toddler sized T-shirts don't come in a lot of colors.

It's a tabby in honor of their cat.  God, I hope it's in honor.  Look, let's just say it's in honor because the cat would be around the age where you don't want to ask.

Monday, February 11, 2013

Fat Fat Fatty

I appreciate Mardi Gras as only an agnostic can: it's an excuse to party, and I'm not spiritually obligated to give up anything.  It's not a last hurrah before Lent; it is a hurrah to kill time between New Year's Eve and St. Patrick's Day.

My only problem with Mardi Gras is that it discriminates against people who have jobs.  Hence my Vendredi Gras parties of year's past.  Which took place after Mardi Gras, thus highlighting the benefits of appropriating the holidays of other cultures and using them as an excuse to throw theme parties.

Now that everybody I know is tired on Fridays and/or out of town, Vendredi Gras has given way to Meowdi Gras, a fundraiser for my Richmond SPCA Dog Jog Team.  Meowdi Gras requires Meowdi Gras decorations.  Having a lot of free time in the afternoons and responsible adult stuff to avoid, Meowdi Gras decorations have been slowly escalating.  Did you know that if you take out the decades old batteries, you can still get a Purrtenders toy to purr?  And then dress it up like a sad old cat lady and declare it a decoration?  And how were there two different lines of unwanted pets in the 80s?

To balance out the crazy of putting stuffed cats all over the house, I decided to make a wreath.  Wreaths are sad and nerdy, but in slightly more stable way than cats.

How to Make a Mardi Gras Wreath

Materials required:

  • A mother who makes lots of wreaths so you can possibly just find a wreath somewhere in the house
  • A mask
  • Mardi Gras beads
  • Feathers
  • Hot glue gun
  • An A.C. Moore cashier who lets you use both your teacher's discount and a coupon
  • Metallic paint you already have in the house
Step one:  Paint the mask.  It's important to do this before work so you can risk having green paint all over your hands.  Contemplate what would happen if you replied to colleagues and admins questions by saying you fingered the Hulk.

Step two: Wait for the mask to dry.  Rummage around for the crappiest wreath.  Consider what the hell you're going to do to make this straw wreath respectable without having to buy more stuff.


Step three: Realize that somehow, despite years of hoarding craft supplies from forgotten, unstarted, and unfinished craft projects, you only have curling ribbon and yarn.  Decide that you are too damn lazy to wrap any of these things around a straw wreath.

Step four: Contemplate Michaels ad.  Remember that Cabbage Patch Dolls were orphans waiting to be adopted.  Google Fluppy Dogs.  Discover that Fluppy Dogs had some weird, dimensional travel thing going on...but also ended up in the pound.   At least My Little Ponies lived in a free, feminist society.  Well, except for when the First Tooth Ponies sold the Newborn Twins into slavery.

Step five: Oh, right, making a wreath.  Go buy some ribbon.

Step six: Wrap ribbon around wreath while the 4 hour journey that is making a king cake.  Run out of ribbon.

Step seven: Buy more ribbon.  Make the mistake of wearing your red T-shirt to A.C. Moore so an old lady thinks you work there.  Decide to buy skinny ribbon.

Step eight: Finish wrapping the wreath.  Realize that your impulse to wrap it with curling ribbon and skinny ribbon was absolutely correct.

Step nine: Glue beads to the back of the mask.  Glue them some more until it looks right.

Step ten: Glue the mask to the wreath.  This may take several attempts as something designed to go over a human face does not easily line up with a wreath.

Step eleven: Hang this bastard up.  Wait for lesser beings to marvel at this seasonally appropriate masterpiece.  Revel in the smug satisfaction of not making some deco mesh horror.


Monday, January 28, 2013

Let there be light

Back in 2010, I discovered embroidery.  You could make all kinds of pictures without being limited by squares!  It was so much faster!  Holy crap, I kind of suck at satin stitch!  I'm too stupid to keep track of what colors I used without an actual pattern!

My greatest talent in needlecrafts is starting a bunch of projects, getting distracted, and stuffing the unfinished projects into a bag that may or may not ever be opened again.

One day while dicking around on Amazon, I discovered embroidery paints.  Which are expensive, so this eventually lead me to think of Sharpies.  While there are actual fabric markers, they're complete bullshit.  The sadistic bastard who created fabric markers designed them so that they would never move smoothly on fabric.  I had no idea if Sharpies would be any better, but I did enjoy writing on my own clothes as a child.  Like most childhood prodigies, I was often bored in school and would do things that are either a sign of great intelligence or sheer stupidity.  I also once cut a hole in the knee of my pants because I wanted to see what would happen.  Experimental design like this is why I didn't end up in a STEM career.


I still need to clean up the rest of the shirt.  I cut the sleeves and the collar off, but I'm pretty happy with my tracing skills.  And my instincts were right: Banana Clip Yellow Sharpie worked better than Normal People Yellow on the blue fabric.  That's right; my instincts only work for arts and crafts.


Monday, October 22, 2012

Spikes

My original plan for Halloween was to dress up as Honey Boo Boo.  Then I actually tried some stuff on and realized that I was crossing a line.

Some of you might wonder how I could have originally thought that dressing up as a child beauty queen would have ever been appropriate, but my beautimous plan was based on the fact that I thought it would be funny.  And then I realized that dressing like Honey Boo Boo would require a short skirt.  Which would be slutty.

Plan B: Bowser!  Which will probably be slutty, but Bowser is a hideous turtle monster, not an eight year old.  And I could just use clothes that I could rewear combined with tasteful accessories.

Spirit Halloween does sell spiked wristbands, but they also pissed me off with their 50 Shades of Bullshit inspired T-shirts.  And as much as I love Halloween, I'm not willing to spend $16 just on crappy looking spiked accessories.

Fortunately, you can get a roll of black duct tape for the cost of one spiked wristband at Spirit Halloween.  And you'll have enough duct tape to let you completely fuck up multiple times!

Step 1: Measure wrists.

Step 2: Cut two strips of duct tape based on wrist measurements.  Make sure to completely fail to take into account what crap you'll dig out of your Random Sewing Notions pile to fasten them.  Also, if you're going to be wearing a certain article of long sleeved clothing, definitely don't put that on to check the size of your wristbands!

Step 3: Put strips of duct tape together, sticky side to sticky side.  Proudly hold combined cuff to bare wrist.

Step 4: Dig through sewing notions.  Fail to find little hooks that you possibly remembered to throw back in the pile.  Contemplate whether or not it's possible to attach that kind of closure one handed.

Step 5: Decide on snaps, mostly because you found a bunch of them.

Step 6: Realize that snaps require a slight overlap and remember that you're going to be wearing long sleeves.

Step 7: Curse as you throw away tiny, useless bracelet.

I was able to get the wristbands the right size and duct tape snaps onto them (using little pieces all around the edges of the snap).  They still have to be very carefully pulled apart.  For the armbands, I realized that I could just pull them on and use my amazing biceps to keep them in place.

The spikes used about three different techniques.  First attempt was to cut out cones, fold the round part over, and put the pointy ends together.

Second idea: cut out triangles, put them together, and attach them to an oval.

Best idea: cut out a diamond, fold it in half, then attach it to an oval.

Hopefully it will be dark and everyone will be drunk.

Monday, August 6, 2012

Negative Self-Talk

I've been making stuff, but, generous soul that I am, it's all for other people.  So, radio silence until stuff gets handed out.  See if you can guess whose heirloom in the making is under my cat!

Meanwhile, the local craft stores have been a goldmine of items that look interesting enough to make me forget my skill level.

I have discovered mini-canvases!  Step 1: Make the internet tell me what kinds of art things you can actually use on a canvas.  Paint?  Do you need, like, special paint?  Can you use Sharpie Brand Permanent Markers because you're a bad ass who doesn't follow establishment rules (and also because they're cheaper than paint and you can use them to label stuff)?

Step 2: Crushing disappointment.  My best bet is to find the next big thing that's going to appeal to hipsters but doesn't require a great deal of "artistic ability" or "talent."  Possibly some sort of cartoon animal with a mustache...

I also discovered that Mod Podge is now making all kinds of Mod Podge and Mod Podge accessories.  I may need to pick up the little flattening roller at some point, and apparently there is some kind of magic spray that will let me print things off the internet and decoupage them (otherwise the ink smears).  This would be especially helpful since I hate "upcycling" that involves destroying perfectly good things to make a stupid box, clock, or decorative bird.

For example, these pages were published in the mid 90's.  And since everybody in the 90's was convinced that their comics would some day be worth millions, these pages probably came from a book that was in perfectly fine condition.  I've got a few issues from the 60's that are fragile, but are still valiantly maintaining book form.  Also, tearing pages out of old books that were complete when you got them?  Also not upcycling.  Yeah, it's not the WORST THING EVER, especially since most of this stuff is slowly and steadily going digital, but it's not upcycling unless it's trash.

Anyway, I have purchased Mod Podge charms.  They're small acrylic shapes that, now that I've paid for them, I'm not sure how I'm going to glue things on them without gluing them to the table/the protective covering placed over the table.

I usually avoid jewelry since, like sewing, I am not willing to suffer through the learning period.  Just like how I'd love to burn some of my earliest crochet projects which torment me with their ugliness.  But I am okay at gluing things onto other things!  I think I might flip through a Free Comic Book Day issue, find something that might look good on one of these charms, and not pretend that it's helping the environment.  I would use the terrible 90's comics I was giddily destroying to make gift bows, but I assume those are too ugly for anything other than blatantly not upcycling them to make gift bows.  (While I may have referred to that project as upcycling in an earlier post, the issue in question probably counts as garbage.  Which would make it upcycling.)

Monday, July 9, 2012

Pinterest lied to me

If you are a lady, you've probably heard of Pinterest.  You may even have an account which you are using to post inspirational pictures for your wedding and/or baby rather than using it to post pictures of cats as God intended.  As those of you who aren't Inspiration Board maintaining heathens know, the internet exists so I can get crochet patterns and look at animals.

For those of you who are not ladies or gay men, Pinterest exists for ladies/gay men to post thinspiration, inspirational decor/wedding pictures, DIY/craft projects/food, and adorable animals.

I finally caved and followed two pins for crafts I convinced myself I would have the time and/or ability to do.  One of them involved the creator referring to questions about how to do the project as "ridiculous."  As in, she was used to dealing with ridiculous questions since she teaches elementary school.  I bought some supplies, but am still afraid of gluing myself to either newspaper or the table.  Or both.

But I figured I had to be able to make luminaries since I had both jars and stickers.

The problem with spray paint is finding a flat, even surface that won't be ruined if uncontrolled paint mist gets on it.  Most flat, even surfaces are either things you don't want to get paint on or in areas--like rooms--that you don't want to risk getting paint mist on.  Other than the hideous sun slowly roasting us all, the outdoors' other great disadvantage is a lack of flat surfaces.  Good things would be not worrying about suffocating on paint fumes.

Maybe some people are able to evenly spray paint things and not have them eventually tip over onto newspaper, but I lack that skill.  And while it's probably not entirely Pinterest's fault that the 804 faced Zeus' wrath twice in one week, severe thunderstorms are not conducive to spray painting shit.

These will probably get finished once going outside stops being like walking into an oven.  Or I'll put some flowers in them, take a tasteful picture, and put them on Pinterest to torment others.


Friday, June 15, 2012

Well, isn't that special

Since managing to miss every state deadline for the 2012 Special Olympic Scarf Project, I've been checking in pretty regularly to see if the 2013 colors have been announced.  Originally the announcement was going to be made sometime in May.  And then it became "It's May, but it'll happen soon."  And, as you may (ha ha) have noticed, it's June.

The Scarves for Special Olympics Facebook page hasn't given any updates in over a month and dissent is brewing.  As is dissent to the dissent.


I've been staying out of the discussion, but I am with Team Impatient on this one.  And I find it much easier to understand impatience than posting snitty comments lamenting how impatient everyone else is and complaining about "so much negativity around a project that is so good and beneficial."  Which I think ignores the fact that some people and groups have planned on knowing the mandatory yarn colors by a certain time--either based on when their group meets, how fast individuals knit or crochet, and when they would need to start working on crafting for gifts/other obligations.


  What Smiley Face definitely seems to miss is that everybody who's posted--whether on Team Impatient or Team Holier Than Thou--is just happy to help out.  Everyone who's posted on the Facebook page or sent an email to either Red Heart or the Special Olympics wants to help--but they can't because no one can start until they know the 2013 yarn colors.  The way the project is set up, every scarf has to be certain dimensions and include two Red Heart yarn colors. Which is really the only way to make sure every athlete gets the same colors, but it also means that, unlike a lot of other charities, there is no way to do anything until the colors are announced.

Despite Edna's reassurance, this is still about as passive-aggressive as writing a blog post about ladies getting pissy about the Special Olympic Scarf Project.  I assume Edna's a parent, because "thos of us who take on this project" (and an earlier comment of "The folks who will work on the project will make sure the job gets done.") has that note of motherly scorn/disappointment.


And I don't think Edna really understands as much as she thinks she does because I don't think it's negative to say you need to find another project for the summer.  Hell, finding another cause that doesn't have specific, unknown requirements is at least slightly better than spending your days refreshing Facebook and sighing to the internet about how much you would like to start doing good.  Or at least better than scolding other people on Facebook.

So, if you are crafty and want something charitable to do while waiting for Scarves for Special Olympics:

  • Snuggles Project--Knit, crochet, or sewn blankets for shelter animals
  • Project Linus--Handmade blankets for ill or traumatized children
  • Many charities collect/distribute hats for the homeless, but I recently saw that wool socks are greatly needed.  Scarves, gloves, and children's toys would probably be good items for upcoming winter charity drives.
For children/teens, items for boys are especially needed.  Teen girls probably do slightly better, but a lot of charitable crafters/shoppers want to buy pink girly stuff.  

For shelter animals, make sure whatever you make or donate can survive the industrial washer and dryer.  As a bonus, you don't even need to bother washing it before you send it off because it's going straight to the laundry room anyway.  


Monday, February 27, 2012

Tuppence the bag

I've been feeding the birds for awhile, using some suet cages in the front yard and a series of bird feeders out back.  And by "feeding the birds" I mean "feeding the squirrels who destroy everything."  After the squirrels gnawed through several bird feeders, I tried a hanging basket that is supposed to be either squirrel proof or squirrel tamper proof.  The first day it was out, a squirrel climbed inside the feeder and got stuck.  I had to go out with gardening gloves and a plant stake to rescue a squirrel from the squirrel proof feeder.

The hot pepper suet feeders seem to work, but they're expensive.  So I realized that I could combine cheap bird seed, something lard like, and hot sauce to create my own.  Take that, squirrels!

Supplies:

  • Crisco from the closet that's probably not toxic since I assume it's mostly plastic and butter flavoring anyway
  • Bird seed
  • Hot sauce
  • The metal cupcake wrappers that I hate
  • Plastic straws
  • Microwave safe mixing bowl
  • Stirring implements
First, melt the Crisco in the microwave.  It will smell like the movie theater from Hell.  And then, once it's mostly melted, add the hot sauce, and it will smell even worse.  You probably think I'm joking, but the smell of melted Crisco and Tabasco sauce has got to be one of the worst things I've even smelled in my life.  It doesn't get any better once you stir in the seeds.

Once this abomination of food-like substances has been combined, pour/scrape/scoop it into the cupcake wrappers.  A cupcake pan would probably help them retain their shape.  Once they're been poured, put pieces of plastic straws in the middle to create holes.  Put the hideous things in the fridge and pray that they don't infuse all your normal food with Hell Popcorn stench.

After chilling and then freezing, I discovered that my cunning plan with straws (to make holes to pass string through) didn't work.  Plan B: drop the horrible little things into a suet cage, hang them from a tree, and never speak of this again.

If I've learned anything from this project, it's that making your own birdseed suet...whatevers is an abomination unto the Lord.  We should all just buy this crap premade as nature intended.  I would just let the birds fend for themselves, but Zoot likes watching them out the window.


Monday, January 16, 2012

Our love is WORLD SHAKING!

I've been doing more stationery sets as part of my "actually use the crap you print off the internet" initiative.  I also forgot my camera at my favorite sister's house, so I've also made a trade with a friend: I crochet, she takes competent pictures.

My cunning plan: Sailor Moon Valentines.  The senshi-in-hearts are from a Japanese site's splash page.  Senshi-in-hears are much easier to cut out than my usual favorite pictures, and it occurred to me: I can just rename the listing if nobody wants Valentines.


I did the stars and hearts cards earlier this month...but I could probably refer to them as Valentines until mid-February, right?  Anything with hearts on it counts?

Not only am I a clever entrepreneur, you should probably know that my terrible handwriting is the only thing stopping me from adding inscriptions like, "You give me a Pink Sugar Heart Attack!" or "I want your Love-Me Chain, Valentine!"
(The rest of the pictures are mine.  As you can probably tell.)
"You make me dead scream"

"Don't Deep Submerge your feelings for me!"

"Our love has the power to destroy the universe."


These aren't Valentines, just lesbians.  Or cousins.  I would've included Pluto, but I didn't have a third white card left.  Cards I have left in one of my sets really does determine what I make.  You see, creativity isn't just about having actual talents or coming up with great ideas.  It's also about figuring out what the hell to do with the crappy colors left in your box of blank cards.  Sailor Moon Says!

Monday, January 9, 2012

Bag Lady

Jamel has a December birthday, and I found a roll of purple duct tape.

You can find online tutorials for turning a plastic bag into a duct tape bag, but there is basically one step: put strips of duct tape on the bag.  I tried to use a standard grocery bag, but that failed miserably.  If you want a bag that doesn't look like crap, you can't really upcycle those crumpled up grocery bags because they're too wrinkled.  I used a smallish Ben Franklin bag.

For those of you playing at home, turn the bag inside out, cover each side with duct tape, then turn it right side out.  You may feel like you're about to destroy the entire thing--that just means you're normal.  Keep pushing, and eventually the thing will right itself.

Make your strips for the front a little bit longer so you can fold them over the top edge.  Make a strip to fold over the sides and the bottom (to cover up the last of the plastic).

I had this picture of Sailor Saturn leftover from a paper craft project, so I figured that would be relevant to Jamel's interests.  You put the picture on using strips of clear duct tape, similar to how the bag itself is made.

Handles are super hard you guys.  Especially since there's nothing duct tape loves sticking to more than itself.  If you mess up earlier in the project, you can carefully reposition a strip.  Once you fail to line up duct tape sticky side to sticky side, everything is ruined forever.  I had to wrap some smaller pieces around the strap to cover up the sticky sides that didn't quite line up.

Since I had some little scraps of Disney Princess wrapping paper leftover and pink duct tape exists, I decided that I must make something for Kristen.  Even though, as I'm sure you remember, Kristen is the easiest person to shop for.

Same size bag, same technique to get the picture on.  For the handle, this time I cut a long strip and folded it over on itself.  It's probably an improvement, but handles are still hard yo.

Just in case anyone can't figure out who a neon bag with Sleeping Beauty on it belongs to.

Monday, November 21, 2011

Making Christmas

I started thinking the Grinch had a point the first time I saw a Charlie Brown Christmas tree for sale.  You know, the crappy little tree that's probably supposed to remind us that there's more to Christmas than buying a bunch of crap?  (I was going to link you to some of these examples, but I figured that might undercut my point.)

So, here's a decoration you can make that will cost about ten bucks and will not send the message, "I fail to grasp the frequently repeated message of a cartoon that has been an important part of my culture for almost half a century."  

You will need to have bought some stuff at some point, but mixed messages are an important part of the holiday season.  You can make it eco-friendly by using old magazines, comic books, and/or leftover wrapping paper instead of tissue paper.  

What You Need:

  • Paper mache reindeer
  • tissue paper
  • stamp and ink pad
  • Mod Podge
  • Optional: Paint, ribbon, bell
I haven't seen any reindeer at Ben Franklin this year, so mine's from Michaels.  Either wait for a sale or use a coupon because there's no way a fake reindeer is worth $9-$20 (I'm not even sure a real one is worth that much).  You'll get a better price with a coupon, but they'll probably be on sale for 30% off for awhile.

Other important information: the reindeer at Michaels are covered in gold foil.  It sheds all over everything and conflicts with my vision, so I also bought a thing of metallic finish white paint to try to get a better base shade.  


DecoArt's Metallic Finish White Pearl is bad, and it should feel bad.  Fortunately, some random white paint I found in my house has my back.  Now my reindeer has a nice base coat, and I've gotten to inhale twice the paint fumes.

For the decoupage, snowflake stamp on purple tissue paper.  I was originally thinking pale blue, but I couldn't find my last set of tissue paper, and I decided to do purple with a blue ribbon (and maybe a bell).

If I've learned anything from stamping tissue paper and gluing it onto a fake reindeer, it's that subtlety gets you nowhere.  What seems like an elegant and discreet pattern on a whole piece of tissue paper loses something once you start tearing it into pieces and gluing it on fake livestock.  If you're using stamps, aim for something between "well thought out pattern" and "smears of ink."

So, same stamp, same paper, black ink.


I've posed the semi-finished reindeer for display mostly because I thought you'd enjoy looking at something other than the newspapers strewn across my table.  For the face and ears, be prepared to do a lot of tearing and on the spot folding.  Once you're past the broad, mostly flat parts, you're going to get glue on your hands.

Sunday I picked up another reindeer and stamp since Michaels was having a sale, and I had a grant from the My Mom Foundation.  This one I decided to keep gold, which is changing the texture a bit.  I'm also trying to apply the glue and press the paper to it.  According to a Michaels project sheet, this is apparently called "the right way."  Unlike "painting" the paper on with glue, the right way involves getting your hands covered in glue, scraps of tissue paper, and ink.  But at least I didn't buy an overpriced ironic Christmas tree!

Other tips: don't have a cat.  Cats are instinctively drawn to sit on any piece of paper you're interested in, so they are not conducive to decoupage.  On a more positive note, Stampabilities Cheapest Piece of Crap Ink Pad ink dries quickly so it won't smear when your cat goes to sleep on recently stamped tissue paper!

Work is delayed until the glue dries and the cat sits somewhere else.

Monday, November 7, 2011

In the name of the moon, Merry Christmas

Holiday commission season has officially started!  And since a lot of what I'm working on is probably going to be for other people, consider Jupiter Star Power! on weekly posting.

Someone who favorited my Outer Senshi notecards asked about a Sailor Moon Christmas card.  Since nobody would want these if I was drawing them myself, that limited my options.  Solution: similar picture on either pastel Christmas colors or light blue with snowflakes.

 Fortunately I started trying to figure out a Glaceon card before I forgot how to enjoy things (don't ask--grad school and mental illness don't mix), so I already had two possible mock-ups.

The stamp was bought...a shameful amount of time ago for a project I totally forgot about until I decided to explain why I had a snowflake stamp.  Apparently you can do things with glitter and fancy inks, but I feel like that's not a good life choice since I'm already going to end up on Hoarders: Michaels Edition.


If some of the snowflakes appear lighter than the others, that's not photographic trickery.  It's also totally a deliberate effect and not because I forgot that stamps could be so damn complicated.

Here's what the final turned out to be.  I did think about using pink to match the outline around Sailor Moon, but it didn't say Christmas so much as "pre-infallible gender screening baby shower."  And now it's sort of wintery/Christmasy while still keeping Sailor Moon's colors.  That was also totally deliberate.

Since I knew the stripe would be slightly smaller than the snowflakes, I decided to turn the stamp rather than trying to line them up.

I also finally got around to adding an Inner Senshi stationery set to the gift shop.  I really like the way these turned out, although some of the cutting was a complete pain in the ass.  Especially since I lost my embroidery scissors (again, possibly for real).

These are made by using a little craft punch on a strip of paper.  Sailor Moon's is made with two strips--the solid red one, then the blue cut-outs.


As I was cutting out hearts in the crude semblance of a line, I contemplated my homemade confetti.  Perhaps there was some clever way to re-use it, like by adding a small detail to the inside of the cards.


Oh, except I used the card color on the inside of all the other cards.  Which means wasting more paper--but look!  Extra details!

If you'd like to enter the fabulous world of cutting up paper, but don't want to spend ridiculous amounts of money to cut little shapes and stamp things, look for the craft store impulse buy bins.  You can find lots of little craft punches.  Are they as good as the ones those decoupage fat cats charge big money for?  Who cares?  It's a dollar, and it makes shapes in paper.

Next lesson: buying the cheapest Aida fabric with a coupon.    

Monday, October 24, 2011

Use the Force

This year's Halloween theme: sexy versions of male characters with facial deformities.  For example, if you already own a lot of black clothing, you already have most of a Sexy Darth Vader costume!  And you can bully your friends into a Star Wars group costume knowing that you will probably be able to finish yours for $5-10.

Since I had some stuff I didn't feel like doing, I decided that I needed to make Darth Vader's chest console and attach it to myself somehow.  

What you need:
  • Black, grey, red, and green felt
  • 1 silver or grey pipe cleaner, one red pipe cleaner
  • a pencil
  • scissors
  • red marker
  • Hot glue gun
You could probably use some other kind of glue, but why would you?  The greedy executives of Big Glue have tried to convince you that you need all kinds of glue to glue with because they don't want you to know the truth: if you can't use a glue stick, use a hot glue gun.  If you're not sure how to tell which one to use, look closely at the items you're using.  Are they paper?  If they're anything other than paper, use a hot glue gun.

If you've got a craft store sized sheet of black felt, cut it in half.  You may need to trim it a bit more--hold it up to yourself to figure out the size.  You'll need three thick rectangles of grey and one thick rectangle of red, three thin rectangles of grey, and a short, fat rectangle of green and red felt.

I used a picture I found online to figure out the placement and sizing.  

The horizontal grey buttons have red stripes in their centers.  Hold your red pipe cleaner against one of the thin grey rectangles.  Realize that a pipe cleaner is too thick.  Use the pencil to make the red pipe cleaner into a cat toy, then draw lines on with a red marker.

For the side...thingies, cut the silver/grey in half.  I folded down the top and the bottom to add the shaping.

Mission accomplished!  Taunt your friends for lacking your awesomeness, felt resources, and empty hours to fill!

Friday, September 30, 2011

You're welcome, USPS

Along with gift/swap stuff I can't post yet, this week I've been working on stationery sets.  They're fairly quick to do (at least compared to cross stitch and crochet), and I like figuring out the color combinations.  I'm sure it's only a matter of time before I get bored with the contrast color stripe thing, but I think it really does add something to the cards.

Sometimes the color choices are obvious.  These two guys are in a Pikachu set.  Even though the internet has learned me that they have nothing to do with the Pichu/Pikachu/Raichu family.  Also, I'm going with "family" because I still haven't reached a level of Poke-craftsmanship where I can say "evolutionary line" without feeling like a moron.

I was going to use the same picture source for Raichu as the other four Pokemon, but I didn't think I could successfully cut around the tail.  Even with this one you can see it's a little bit raggedy.  Which hopefully is part of its handmade charm.  Look, just focus on its adorable face.

 Some of the color choices are more difficult.  Doing eeveelutions was one of the reasons I stocked up on more of these pastel cards (also, JoAnn tricked me, and I wasn't able to get another box of the blank cards I use).  I was going to use brighter colors, but it just made both the card and the Pokemon look washed out.


The Outer Senshi are some of the leftover cards from JoAnn.  Now it's becoming a matter of "what can I actually make with these colors," but I really like the way these turned out.  As you can probably tell, I usually go with skirt color/bow color for the card and accent, but I don't think Uranus would look as good if I'd done it that way.  hurr hurr Uranus


I have since noticed that Saturn doesn't have a little heart.  I'll probably fix that as soon as my friend Jamel, Saturn Super Fan, notices and gives me crap for it.

The Outer Senshi are already up in the gift shop.  Unless anybody's absolutely overwhelmed by the need to have some of these, I'm going to be adding stuff over the weekend.  Since that's basically how Etsy wants me to do things.